Page 1 of 3 123 LastLast
Results 1 to 10 of 23

Thread: 4Runner Heated Mirror / Mirror Glass Swap, The Hard, Harder, and Horrible Ways.

  1. #1

    4Runner Heated Mirror / Mirror Glass Swap and Wiring Solution

    A couple of years ago, I decided I really wanted to swap heated mirrors onto my SR5.

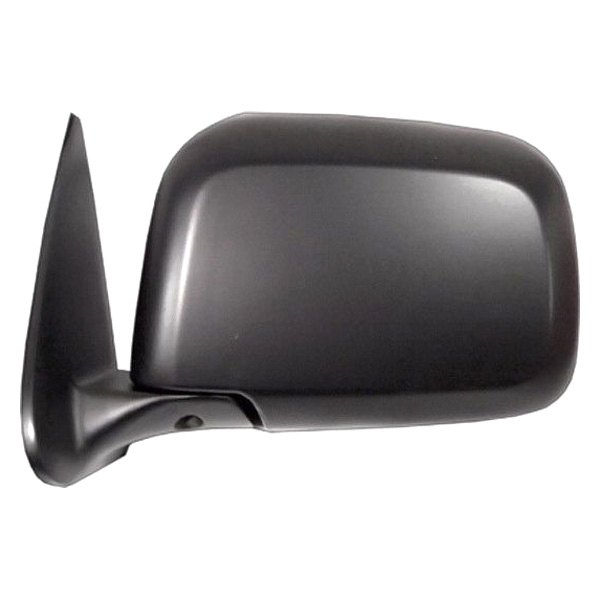
    I bought a pair off of a rolled 4Runner, and they sat on the shelf until now. The mirrors I purchased were silver, and the passenger side was pretty banged up from being rolled. My original plan way to paint it to match, or paint it black, but I knew I wouldn't be happy with seeing bits of silver that I couldn't reach.

    I decided to do it the hard way, by swapping the glass from the heated mirrors to my non heated mirrors.

    I don't recall ever seeing a guide on how to disassemble the mirrors. The glass is available separately from the housing from the dealer, and is less than 30 dollars. However, replacing the glass with heated glass is still not that simple, as you need power wires from the door to power the heating element.

    Section 1 will cover swapping heated glass and actuator from 1 housing to another. This is also helpful if you need to take the mirror apart for some other reason, such as adding additional wires to the bundle for turn signals or something else.

    Section 2 will cover the wiring through the door and through the dash to get your fancy new heated mirrors hot. Useful if you are simply swapping housings from non-heated to heated mirrors. Also great if you go to a third party heating element, which I have seen around on the internet.

    Section 1:

    Removing the mirror from the vehicle:

    Remove door panel. www.4runners.org had a great writeup but appears to be down now.

    Remove trim piece opposite the mirror. This often has the tweeter installed. It should pull off top corner first and then slide up.

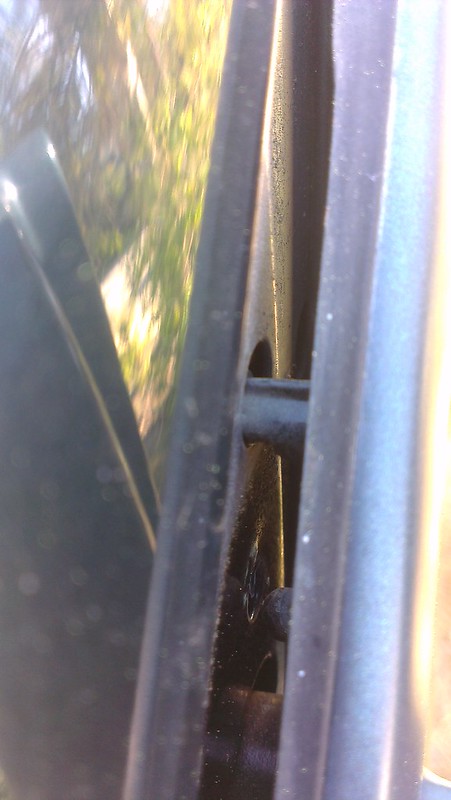
    Disconnect wiring harness -bottom of photo- to mirror and cut the tape from the retainer clip -middle of the photo, and remove 3 10mm head bolts. Don't worry about the mirror falling off, it has a retainer clip.


    Here is the retainer clip. It is actually a screw, but there is no access from inside the door.


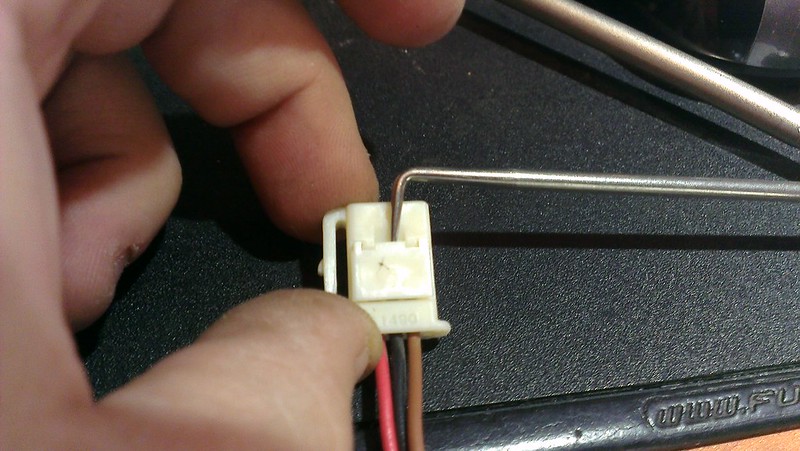
    Once you remove the mirror from the vehicle, you can now remove the plug from the end of the wires. To do this, use a pick to lift up the tab in the middle of the connector. It won't completely come out, but needs to be lifted up to remove the pins.


    Next, use the pick to pry up the tabs above each pin, and gently pull the wire out. The tabs are the white bits above the shiny metal pins.


    After that, you can remove the tape around the rubber grommet. It is best to peel it off and not cut the grommet. Make sure the wire is free to move through this grommet, and remove the rubber grommet, being careful not to tear it.

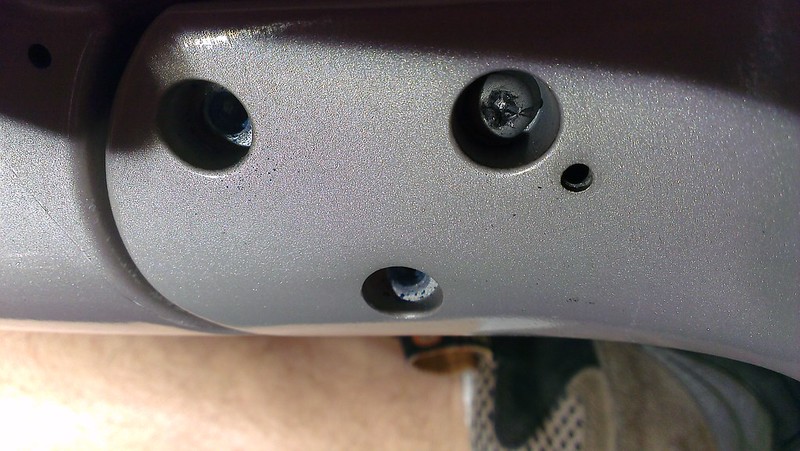
    Now here comes the hard part, removing the three screws on the bottom of the mirror. On my left mirror, I got lucky and all three came out with a bit of a fight. On the donor left mirror, 2 came out and one stripped out. The two donor right mirrors had all the screw heads strip out and caused my significant frustration.


    Each screw is set in with permanent thread locking compound. This requires a VERY good Phillips screwdriver and a small torch.


    If you are lucky, you will end up with the screws on the left. If you are like me, you will end up with a pile much like the right side.


    If you end up with stripped out heads, I think the best solution is to drill them out with a 1/4" drill bit. I tried screw extractors with no good results.


    Once you have the head of the screw removed, you can remove the heavy die cast arm from the mirror housing:


    To remove the remainder of the screw, use vise grips to grab a hold of what is left, apply heat and twist out:

    Unclip the wire:


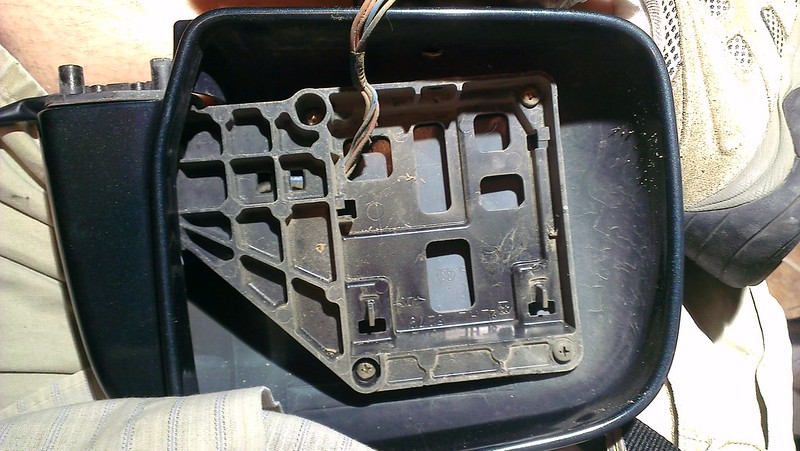
    Next, we need to remove the glass. One screw on the bottom of the housing holds the glass and actuators.


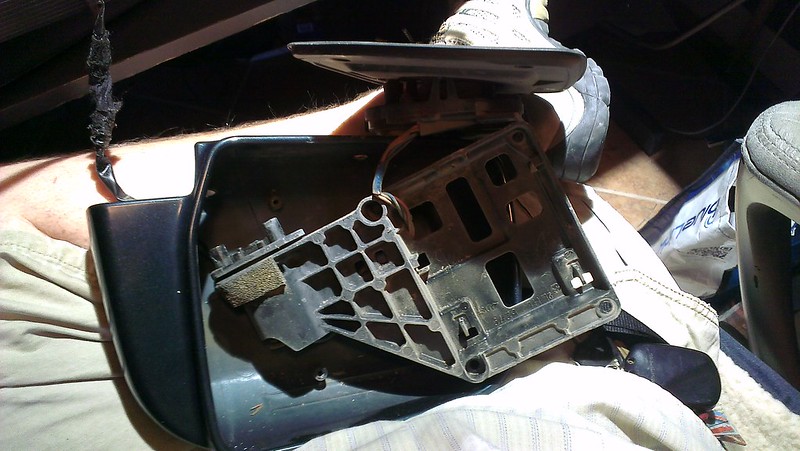
    Once that is removed, turn the mirror glass side down and wiggle the glass until it pops out. It will still be held by the wire. Turn it upright again and hold the glass up to reveal 4 screws holding the die cast piece and housing together. Remove the 4 screws and ease the die cast piece out of the housing.


    Unclip the wire from the back side of the die cast piece and slip the wire through the hinge. Your mirror is now broken down into it's component pieces.

    Reassembly is the reverse of this process, and explained more in the next post.
    Last edited by Seanz0rz; 11-02-2013 at 05:53 PM.
    2005 Lexus LX470 - Stock for now...

    1998 Toyota 4Runner SR5 V6 4x4 + a bunch of goodies. Lifted, Locked, Illuminated and Armored. Winner,"Best Offroad Truck" - 2010 Pismo Jamboree. It's been upside down and still drives me to work.

  2. #2
    Since I destroyed most of the screws, I used these as replacement, with Red Loctite.


    Here are some images of the heated mirrors coming back together:

    Note the path of the wires, the purple and black/white are the heater wires:


    New tape around the grommet:


    Reinserting the wires into the connector, note the orientation of the pin:


    The original heated mirror had a 6 cavity plug, where as the power mirrors had just 3. The above picture is using the 3 cavity connector to fit the stock wiring in the door. The heating element wires will have to be attached separately.

    Other tidbits:
    I believe 01-02 mirrors are a slightly different shape than 96-00.

    Drilling out the screws was the worst part about this mod. It took the longest, caused the most frustration and nearly made me quit. I think the passenger side mirrors were worse because of the increased exposure to moisture from gutters and such.

    To reattach the mirrors to the truck, pass the wire through the opening, push the retainer clip through the hole and go around to the other side of the door and insert the bolts. This clip is a great idea and keeps the mirror from falling off. It can be a bit of a bear to remove the mirror though.

    Those screws...
    Last edited by Seanz0rz; 11-02-2013 at 05:27 PM.
    2005 Lexus LX470 - Stock for now...

    1998 Toyota 4Runner SR5 V6 4x4 + a bunch of goodies. Lifted, Locked, Illuminated and Armored. Winner,"Best Offroad Truck" - 2010 Pismo Jamboree. It's been upside down and still drives me to work.

  3. #3
    Section 2:

    Regardless of how you got heated mirrors (from a housing swap or swapping the glass like I did), here is how to wire it:

    Now to the really scary part! WIRING!

    Once you've contained your self and stopped the uncontrollable sobbing, it's actually not too bad.

    The most advanced concept we will use today is a relay. Actually, we won't even use a relay today because I haven't gotten that far!

    First, let's handle the passage from the top of the door into the kick panel. That should be good enough for today.

    Remove the door sill and kick panel, you will need access to this later.

    Remove the speaker mount. Mine was customized years ago, so I am not exactly sure what it is suppose to look like stock. Either way, 5 screws and a yank and it is out. You should be able to disconnect the factory speaker with a connector.


    Since I don't plan on ever removing the mirrors again, I just soldered the end of the heater wires directly to my new wire that will pass through the door. If you wanted to, you could put some disconnects or a fancy connector. Just remember, there is not much room in the door.

    Wires got soldered and heat shrink, plus some tape.


    To run the wires, I ran them through the boot between the door and door jamb. There was an existing hole on the jamb side, I am not sure if this was there or cut when the stereo was installed. Wire was taped to a headless zip tie.


    Once everything is wired in the door, you can reassemble the door panel.

    Important notes:
    I think it is easier to go from the vehicle to the door. I did both and had less trouble going that way.

    Keep the wires away from the window track.

    The wires will run from the doors to the driver's kick panel, so give yourself plenty of wire from the right door.

    Also, when you are too far away from the garage to get power for the soldering iron, you can run it off a 150W inverter!


    Tomorrow, the relay and rest of the wiring.
    Last edited by Seanz0rz; 11-02-2013 at 05:57 PM.
    2005 Lexus LX470 - Stock for now...

    1998 Toyota 4Runner SR5 V6 4x4 + a bunch of goodies. Lifted, Locked, Illuminated and Armored. Winner,"Best Offroad Truck" - 2010 Pismo Jamboree. It's been upside down and still drives me to work.

  4. #4
    So I decided to just finish it up tonight.

    I ran my brown wires (ground) to ground points on each kick panel. I use the screw that holds the plated bracket for the kick panel.

    I ran my passenger side blue wire through the dash and to the left kick panel area. Both blue wires terminate at pin 87 of the relay.

    I grounded the relay coil (pin 85) at the kick panel mounting screw.

    From my engine bay fuse block, I ran a grey wire through the firewall to relay pin 30.

    Pin 86 (other side of the coil), goes to the defroster +12vdc line giving power to the rear window. This allows the mirrors to be controlled just as the rear defroster is, and the way it is done from the factory.

    Schematic:

    (Flickr is being uncooperative, I will rotate it properly when it unconstipates itself.)

    From my 2002 4Runner manual, I learned the defroster wire is black. I have had good luck so far with color codes, but wires have moved connectors over the years.


    I saw a black wire on the main floor harness under the driver's kick panel. I probed this with a DMM. With the key off, I got 0v, with the key on I got 0v, with the defroster on I got 12v! Score!!! I confirmed this several times to make sure.

    Once I was positive this was the wire, I cut into it and spliced in the green wire. Some solder and a generous amount of electrical tape finished up the wiring.


    I put in a 10A fuse, turned on the defroster and was happy to feel the mirrors get very warm! Much warmer than the rear window ever gets.

    On a side note, the light on the defroster button works occasionally. It wasn't working the other day, then it worked, tonight it didn't, not sure what is going on there.


    So that's about all I have to say. Hopefully this helps someone in the future!
    Last edited by Seanz0rz; 11-02-2013 at 08:24 PM.
    2005 Lexus LX470 - Stock for now...

    1998 Toyota 4Runner SR5 V6 4x4 + a bunch of goodies. Lifted, Locked, Illuminated and Armored. Winner,"Best Offroad Truck" - 2010 Pismo Jamboree. It's been upside down and still drives me to work.

  5. #5
    So I take it you dont have one of them lisle hand impact drivers Sean? I use mine so much its not even funny. Woulda made short work outta them screws
    Marc<br />96&#39; T100 SR5 4x4<br /><br />Other rides:<br />00 Honda 416EX

  6. #6
    No, I don't.

    We've had a discussion about the use of phillips head screws on the 4runner. Anything that is a machine screw, especially into aluminum, seems to seize up. If you don't have a perfect fit on the screw (many of my driver tips seem to not fit perfectly), you will strip out the heads. IAC valves are famous for this. Mike and Ken have been replacing them with socket head cap screws, which is a much better idea.

    On the two passenger side mirrors I did, they refused to budge and the heads yielded quickly. Even after drilling the head off and tackling them with vise grips and ALOT of heat, they were still temperamental. They had some corrosion on them when I pulled them out. I don't think they were really ever intended to be removed. Maybe I just suck at removing screws, but I know it will be a problem for others, hence my lengthy advise above.

    Besides the problems with painting to match, the donor units had quite a bit of road rash I would have had to fill.
    2005 Lexus LX470 - Stock for now...

    1998 Toyota 4Runner SR5 V6 4x4 + a bunch of goodies. Lifted, Locked, Illuminated and Armored. Winner,"Best Offroad Truck" - 2010 Pismo Jamboree. It's been upside down and still drives me to work.

  7. #7
    I hear ya Sean.

    I asked because I have issues taking apart carburetors on bikes/quads. They always use these cheapo brass or pot metal screws and strip out SUPER easy and are very hard to remove due to dirt. I now just take the hand impact driver, get a good phillips bit and a few smacks they come right out.
    Marc<br />96&#39; T100 SR5 4x4<br /><br />Other rides:<br />00 Honda 416EX

  8. #8
    I think I will grab the HF impact kit and keep it in the truck. Needed one for a long time.

    I'd like to add, I wonder if you can just buy heated glass, then run new wires through the housing. I am not sure what exactly comes in the package when you order just the glass, the pictures on toyodiy are vague on this.
    2005 Lexus LX470 - Stock for now...

    1998 Toyota 4Runner SR5 V6 4x4 + a bunch of goodies. Lifted, Locked, Illuminated and Armored. Winner,"Best Offroad Truck" - 2010 Pismo Jamboree. It's been upside down and still drives me to work.

  9. #9
    Nice mod Sean. My rear window defrost hasn't worked in years so I never use the defrost button/mirrors. With trips to the snow with ice and parking lot make out sessions with steam I just drive blind trying to avoid the bus full of nuns. I do remember right after I bought the 4Runner I noticed the glass and surround were quite toasty. Enough so I thought about rubber banding a bagel to them to warm them up.

    I've got a hand impact that I bought to work on a friends tractor. He's off the grid and my OBA didn't have a large enough tank to keep up with an impact. It's a 1/2" drive which makes me wonder about the usability on a small screw. You have to smack it pretty hard to make the drive end spin. I could imagine squaring up to use it on an IAC valve only to see it fly across the work bench in pieces.

  10. #10
    As usual, nice detailed writeup Sean! Heated mirrors are nice, I didn't know mine had them until one rainy day when I turned on the rear defogger and saw steam coming off my mirrors.

    The 96-99 mirrors are shaped differently than the 00-02. The 96-99 mirrors are very blocky in appearance while the 00-02s have a radius on the inside edge. The glass is not swappable between the two.

    96-99:


    00-02:

Page 1 of 3 123 LastLast

Posting Permissions

  • You may not post new threads
  • You may not post replies
  • You may not post attachments
  • You may not edit your posts
  •