Page 1 of 2 12 LastLast
Results 1 to 10 of 19

Thread: FlyingWil's '01 Taco DC

  1. #1

    FlyingWil's '01 Taco DC


    Owner: Flyingwil
    Location: Mesa, AZ

    Make: Toyota
    Model: Tacoma Double Cab SR5 TRD
    Year: 2001

    Engine: 3.4L, normally aspirated
    Trans: Auto
    T-Case: Stock
    Front Axle: El Stock-o IFS, Bilstein Shocks, Spacer.
    Rear Axle: Bilstein shocks,Electric Locker
    Tires: 255/85 R16 BFG MT/KM
    Wheels: TRD 16x8

    Additional Modifications:
    SAW 2.5 (replaced dealer installed RevTek lift)
    Deaver 10 pack leaf Springs
    Demello Rock Sliders
    Sure Power Auxiliary battery system
    Dual Odyessey batteries
    ARB Safari Snorkel
    Lo-Tek Gauge Pod
    Cyberdyne Digital Gauges
    Eezi-Awn 1600 Roof Tent
    Engle 45L Fridge/ Freezer
    TwoZone Fridge Compartment
    10 port aux. fuse block
    Grey wire modification
    Amsoil Oil and Filter
    Amsoil Air Filter
    PowerSlot rotors
    Can-Back topper

    Some others I am sure I forgot...
    Wil Kuhns<br />Sierra Expeditions <br /><br />The only regrets in life are the risks you didn&#039;t take.<br /><br />Mod Progress Gauge: [|||||||||-] = 90% Complete as of 03 FEB 2008. My Taco&#039;s Garage

  2. #2

    The begining...

    My Taco is a 2001 Toyota Tacoma Double Cab 4x4 TRD. I feel in love with the styling of the first gen Tacoma's and knew one day I'd get one. 2001 rolled along and out popped the Double Cab... I had to have one. After years of nagging, my wife finally caved and now I have my Taco!

    [img width=800 height=600]http://i15.photobucket.com/albums/a352/flyingwil/TTORA%20-%204%20Peaks%20Run/IMG_0434.jpg[/img]
    Wil Kuhns<br />Sierra Expeditions <br /><br />The only regrets in life are the risks you didn&#039;t take.<br /><br />Mod Progress Gauge: [|||||||||-] = 90% Complete as of 03 FEB 2008. My Taco&#039;s Garage

  3. #3

    Front Suspension

    The RevTek lift came direct from the dealer.


    The RevTek was recently replaced with SAW 2.5 coilovers. You know you might be a redneck when your pregnant wife comes out to help you wrench... and learn how the truck works... That's just one hell of a wife!


    Wil Kuhns<br />Sierra Expeditions <br /><br />The only regrets in life are the risks you didn&#039;t take.<br /><br />Mod Progress Gauge: [|||||||||-] = 90% Complete as of 03 FEB 2008. My Taco&#039;s Garage

  4. #4

    Communication

    I mounted a Uniden Pro 520XL CB radio in the ash tray location. It was very easy to make flush, and seems like a lot of others have problems making it flush. First, I removed the 2 screws that hold the ash tray slide out and cut the rear out with my dremel tool. To make it flush I used a heat gun and a screwdriver to make a small indentation on the air duct. I heated the duct up for about 20 seconds and pressed the area in with the back of screwdriver where the 90° coax elbow would hit. You only have to press it in about 1/4 of an inch. I used an 90° coax elbow to connect the Lil' Wil antenna coax to the CB. I them used 3M double sided mounting tape to secure it in place (it is a tight enough squeeze it really is not needed, but I wanted to be safe for future washboard roads).


    I think the end results look great. (Pardon my dust, just got back from a 4 Peaks run when I took the pics!)

    I ran the Coax for the antenna through the door sills on the passenger side. When I am not using the CB the antenna stores behind the rear seat and the cable is not visible. Total install took about 30 min.


    Soon as I get around to more permant soultion I will relook this. But for now, and my 6'2" parking garage at work, this will have to do. It's bad enough hearing the radio antenna cllink all the way up to the 5th floor, I can't imagine adding the CB antenna.

    The CB also has a PA out put which I would like to add in the near future, but not sure how I will do it. Why? I think it could be beneficial to help in spotting when in tight areas with out blocking CB waves when in large groups. Not a necessity so its last on my list.
    Wil Kuhns<br />Sierra Expeditions <br /><br />The only regrets in life are the risks you didn&#039;t take.<br /><br />Mod Progress Gauge: [|||||||||-] = 90% Complete as of 03 FEB 2008. My Taco&#039;s Garage

  5. #5

    Navigation

    For navigation I am using a Delorme PN-20. Previously I was using a Dell Axim X30H PDA, and a Bluetooth GPS. I modifed a glass powered PDA mount and mounted to where the air bag selector witch would be in a mini or a xtra cab.


    The above photo is my PDA running OnCourse Navigator, which will automatically direct you to your destination along with voice prompts.

    The Rikaline GPS is tweeked for accuracy while flying... (I use Pocket FMS) and from the Rally I learned has to be retweeked during ground usage, with OutDoor Navigator.

    With the PDA I am able to use Bluetooth to access the internet and surf the web and download Topo's!

    I plan on upgrading this to a CarPC in the future... Just need to lay down the specs and build.
    Wil Kuhns<br />Sierra Expeditions <br /><br />The only regrets in life are the risks you didn&#039;t take.<br /><br />Mod Progress Gauge: [|||||||||-] = 90% Complete as of 03 FEB 2008. My Taco&#039;s Garage

  6. #6

    Electrical

    As soon as I got my truck I upgraded to an Optima Red Top.


    At the time I took this picture I was only running one battery, but as I add the Engel Fridge I also added an auxilary fuse box and a dual battery set up.

    My auxiliary fuse block is a Blue Sea block from West Marine. These are really nice units, and a bargain compared to other units on the market.


    Although, my installation is only temporary, it is beginning to serve it's purpose. It will later be moved. It will support the full time power requirement units, such as the radios, Engel, lights, ect...

    For the time being I mounted it to the rear wall using an old 4 ga. amplifier kit I had laying around. The pro to this is that it has an in line fuse on the positive cable, that will help prevent an fires, or melt downs.


    In the last picture you can see my *temporary* Engel hook-up. I twisted the wires to prevent electrical interference with the CB.

    I put dual Odyssey 1200's Batteries in the stock location with a Sure Power 1315-200 battery isolator / combiner and used marine cables to complete the wiring:


    Wil Kuhns<br />Sierra Expeditions <br /><br />The only regrets in life are the risks you didn&#039;t take.<br /><br />Mod Progress Gauge: [|||||||||-] = 90% Complete as of 03 FEB 2008. My Taco&#039;s Garage

  7. #7

    Protection

    As of right now the only protection I have for my Taco is my Demello Off-Road HD round bolt on sliders built with 1.75" .120 wall round tubing.

    This type of protection is critical in guarding the body panels during challenging terrain.

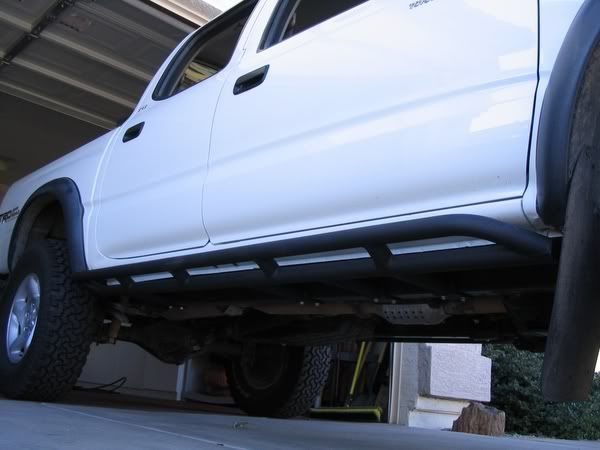
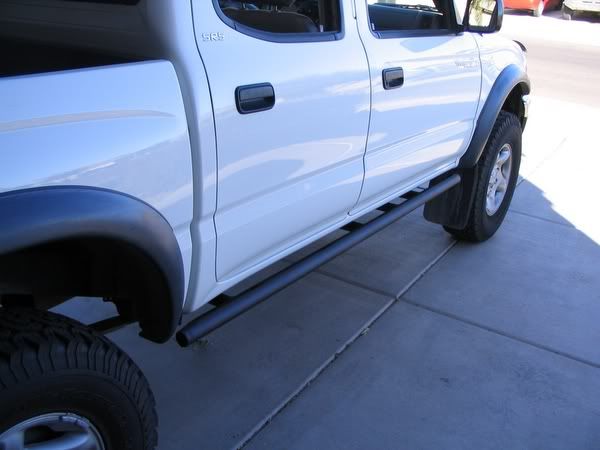
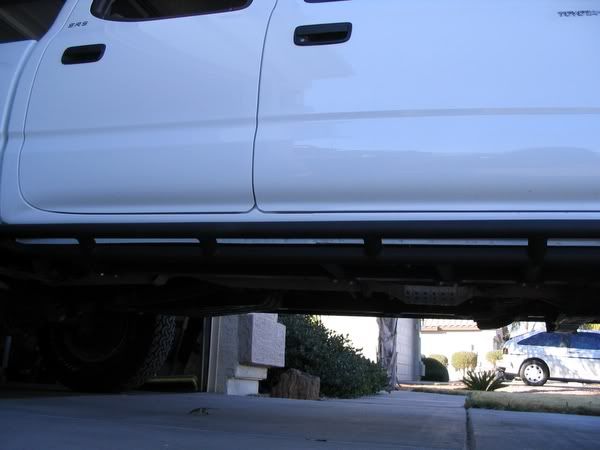
    1. The rock sliders act as a skid plate, allowing the vehicle to slide over rocks, mounds and logs, instead of damaging the vulnerable sheet metal.

    2. The rocker protection guards the side of the vehicle from damage caused when sliding into a tree or rock, as often occurs on slick surfaces.

    3. When properly mounted the rock sliders provide a secure jacking point for lifting the vehicle to change a tire, or to add rocks or traction aids to extricate the vehicle from being stuck.

    4. A well designed slider also acts as a step, running the length of the cab, providing easy access to the roof, racks, kayaks, etc.

    5. In heavily rutted terrain, the slider allows the driver to use the bars as a transition point between the front and rear tires, as the slider allows for a smooth change from the front tire to the slider to the rear tire without causing damage.

    6. On longer wheelbase vehicles, the rock sliders can act as a pivot point, effectively rotating the vehicle against a solid point (like a rock or rut) when under power. This action "cuts" the corner of a narrow, tight obstacle that does not permit backing up for a multi-point turn.
    Here are my sliders:


    Later to come will be a swing out rear tire carrier (Aug)
    Wil Kuhns<br />Sierra Expeditions <br /><br />The only regrets in life are the risks you didn&#039;t take.<br /><br />Mod Progress Gauge: [|||||||||-] = 90% Complete as of 03 FEB 2008. My Taco&#039;s Garage

  8. #8

    Air

    Ahhh to breathe better... I of course did the http://www.wattora.com/mods/deckplate/"]deck plate mod.[/URL] I now regret doing it since I added the snorkel.

    For the Air filter I am running an Amsoil filter. I had played with K&N and out of the box, I was getting oil deposits up the intake and the K&N found it's resting place in the trash out of fear of damaging the MAF.


    did the dif breather mod, following these two write ups:
    http://www.wattora.com/mods/diffbreather/"]WATTORA's Write-UP[/URL]
    http://www.4x4wire.com/toyota/minutemods/breather/"]4x4 Wire's Write-Up[/URL]

    The following is a summary of the two and what I did... most pictures are off of the WATTORA Write up. The have a note stating that this does work on the 3rd gen Taco's too!

    Parts/Materials Needed:
    • 1 Toyota part number 90404-51026 Listed as a "Union"
    • 8 feet of 1/4" rubber fuel line
    • 2 small hose clamps
    • A few nylon wire (zip) ties


    Tools Needed:
    • Box/Open wrenches, 10mm and 14mm
    • Screwdrivers
    • Wire Cutters
    • 1 cup boiling water


    Estimated Time: < 1 Hour

    Procedure:

    Here's a shot of all the parts, with the exception of the hose.

    Image From WATTORA
    And the stock breather on the differential housing.

    Image From WATTORA

    Image From WATTORA

    Use a 14mm wrench to remove the stock breather. Use a rag to clean around the breather well before you remove it completely.

    Image From WATTORA

    Use a 10mm wrench to thread the 90404-51026 Union into the differential housing. It will tighten down until about one thread is exposed.

    Image From WATTORA

    Dip one end of your rubber hose in a cup of boiling water for 30 seconds, then insert the stock breather threads into the hose. You want to get all of the thread into the tubing. This will allow your diff to continue to breath as it would in a stock configuration and will cut down on the chances of dust or moisture getting sucked in. Secure the breather with one of the hose clamps. Some folks use VW type fuel filters on the ends of their breathers.

    Image From WATTORA

    There are a variety of places you can vent to. Some choose to run a hose all the way up to the engine compartment, I followed the electric locker cable/brake lines up by the fuel filler neck. This view is from the perspective of the left, rear tire, looking up into the bed rail. The stock breather end of the hose was secured with wire-ties so that it was above the fuel neck. The hose was routed along the fuel filler neck, over the frame and along the locker cable.

    Image From WATTORA

    In this case I removed my fuel cover and drilled a 1/4" hole in the cover and chose this place to mount the breather (behind the fuel door)


    Once the hose was routed down near the differential, I left a bend in the hose so that it would not be pulled tight when the suspension flexes. Once the hose is secured, cut off the excess and fitted the hose over the "Union". Secure the hose with the remaining hose clamp.


    I thought I would post this as many "Cheap Mod's" do not get posted. And in fact are done. Hope it helps... Thanks to WATTORA and 4x4 Wire's for the write-ups!

    I later added the ARB Safari Snorkel
    Wil Kuhns<br />Sierra Expeditions <br /><br />The only regrets in life are the risks you didn&#039;t take.<br /><br />Mod Progress Gauge: [|||||||||-] = 90% Complete as of 03 FEB 2008. My Taco&#039;s Garage

  9. #9

    Engel Frigde/Freezer


    After opening everything and installing the handles, I installed the hinge lock.


    The lock was super easy to install.

    1) Remove lid.


    2) Seperate Lock from spacer.

    [img width=800 height=600]http://i15.photobucket.com/albums/a352/flyingwil/IMG_0608.jpg[/img]

    3) Remove hinges on Engel, install the lock behind the LEFT hinge and retighten screws.

    [img width=800 height=600]http://i15.photobucket.com/albums/a352/flyingwil/IMG_0609.jpg[/img]

    4) Place the spacer behind the RIGHT hinge and screw back in place.

    [img width=800 height=600]http://i15.photobucket.com/albums/a352/flyingwil/IMG_0612.jpg[/img]

    5) DONE!


    Next up was to put the Transit cover on...


    Along with my engel came my mounting solution, the Engel Slide.

    This is one slick unit, as you can see all bearings are sealed.


    The only mod to this is Plasti-dipping the hardware (Below)


    I decided to coat the hardware with black Plasti-Dip to mitigate vibrations, and prevent scratches to the Engel's handles.


    Wil Kuhns<br />Sierra Expeditions <br /><br />The only regrets in life are the risks you didn&#039;t take.<br /><br />Mod Progress Gauge: [|||||||||-] = 90% Complete as of 03 FEB 2008. My Taco&#039;s Garage

  10. #10

    TwoZone

    The TwoZone is an add-on compartment to the Engel. It basically goes in place of your lid and your lid is reused on top of the compartment, thus increasing the size of the Fridge/Freezer. Your lid is then reused on the top of the TwoZone. There were Rumors on some OZ Forums of the compartment Voiding Warranty, but these rumor are false, and in fact Engel promotes it uses and does exhibitions shows with TwoZone. (I will take pics as soon as I get it). The TwoZone will increase the capacity by 21 liters (22 quarts if I calculated it correctly), for a weight gain of 11lbs. It measures 21.65" X 14.96" X 10.24".


    [img width=800 height=600]http://i15.photobucket.com/albums/a352/flyingwil/IMG_0716.jpg[/img]


    Ezy-Move too!


    Wil Kuhns<br />Sierra Expeditions <br /><br />The only regrets in life are the risks you didn&#039;t take.<br /><br />Mod Progress Gauge: [|||||||||-] = 90% Complete as of 03 FEB 2008. My Taco&#039;s Garage

Page 1 of 2 12 LastLast

Posting Permissions

  • You may not post new threads
  • You may not post replies
  • You may not post attachments
  • You may not edit your posts
  •