Page 2 of 2 FirstFirst 12
Results 11 to 19 of 19

Thread: FlyingWil's '01 Taco DC

  1. #11

    Fridge Mounting

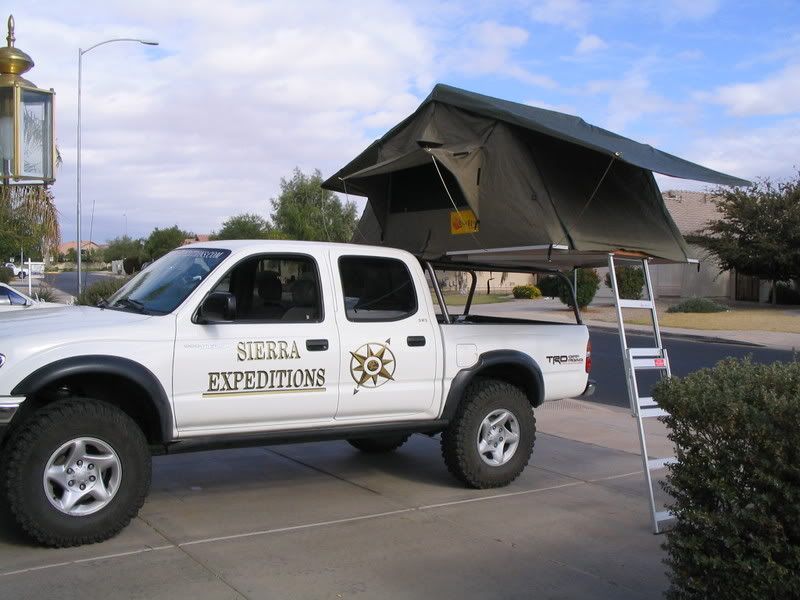
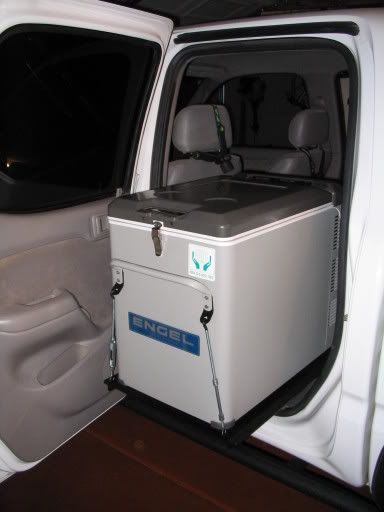
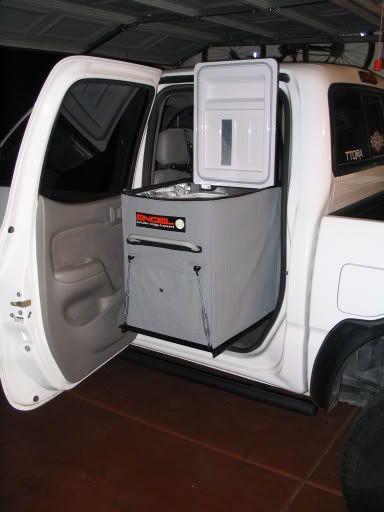
    I was originally going to mount the slide in the middle of the cab, but with the addition of the twozone, I did not want to cut out the rear view mirror too much. I also became concerned about the height, and wanted to make sure I was able to get things in and out easily. I was questioning my decision to get the slide as opposed to slide-lok...when the light bulb went off! END RESULT: Mount the slide so that it sides out the door!

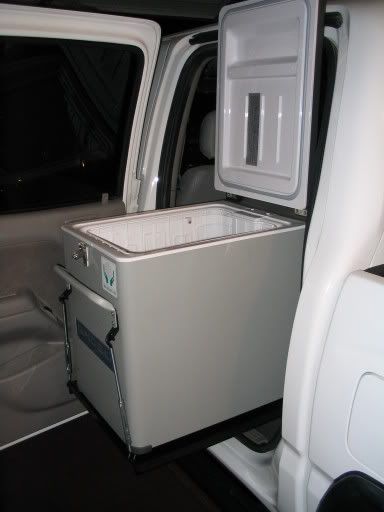
    It slides out about 4-5 More inches than in this pic...


    Easy Loading and unloading now!


    It is close but not touching any of the door molding.
    [img width=600 height=800]http://i15.photobucket.com/albums/a352/flyingwil/IMG_0641.jpg[/img]

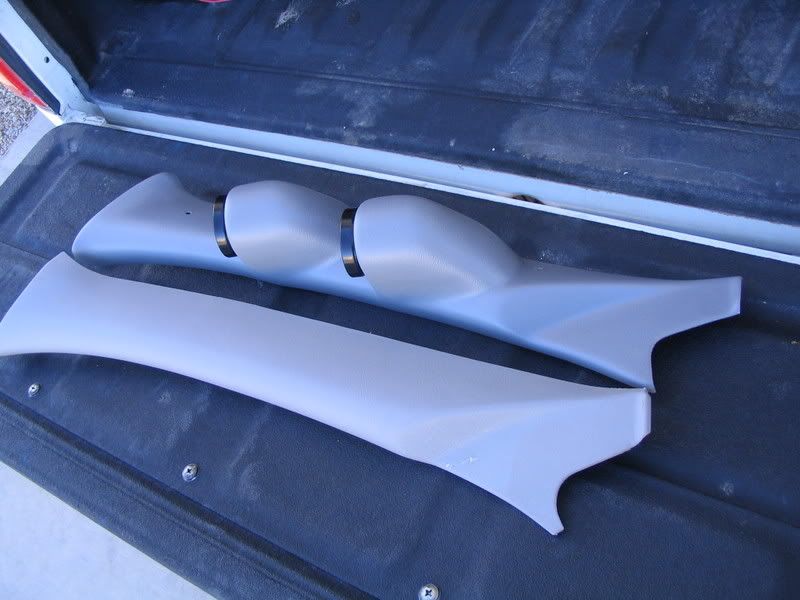
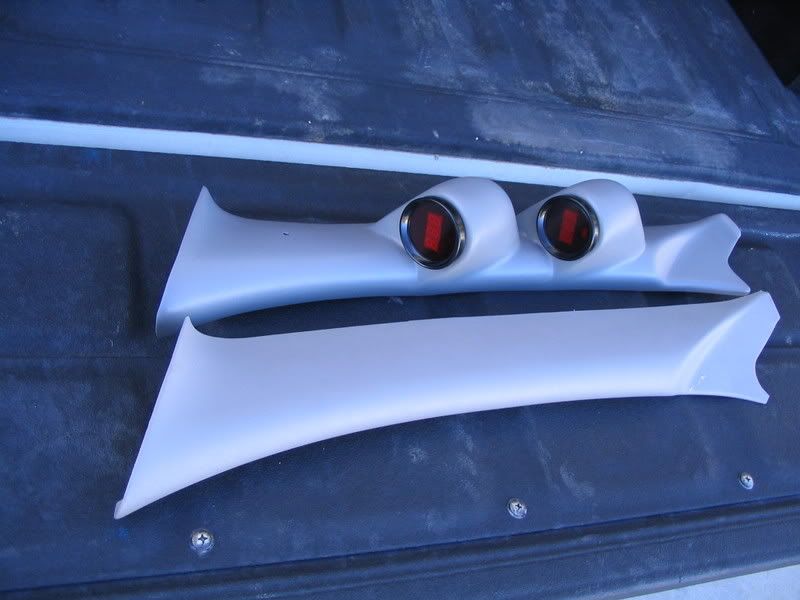
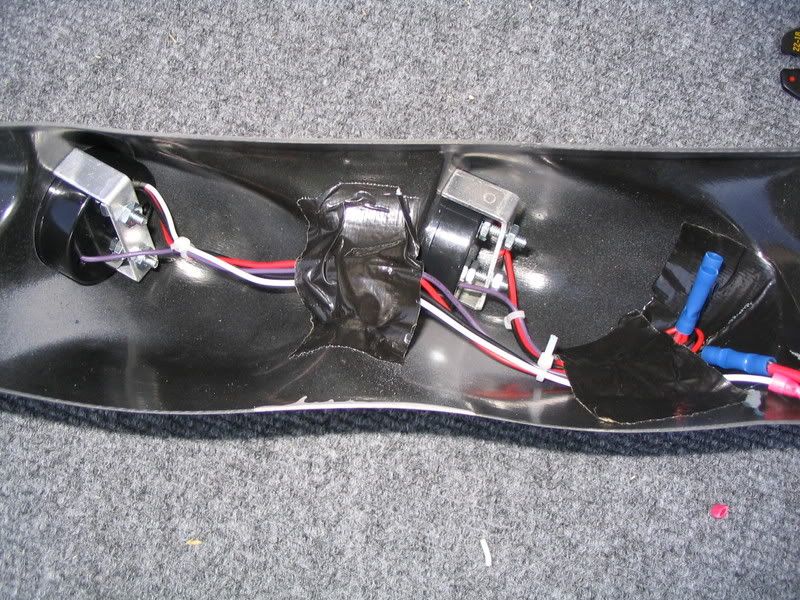
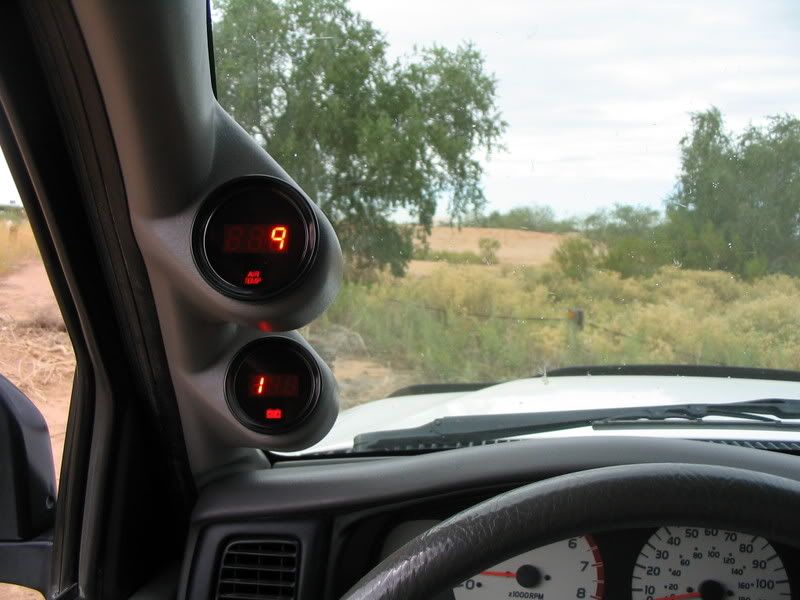
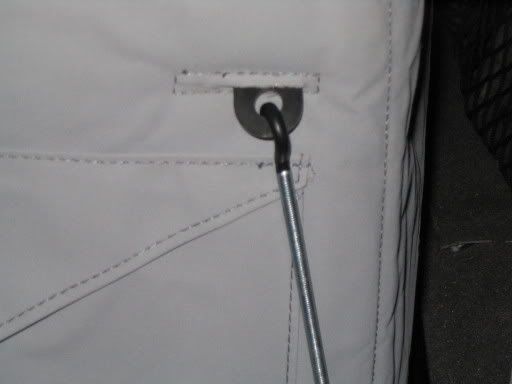
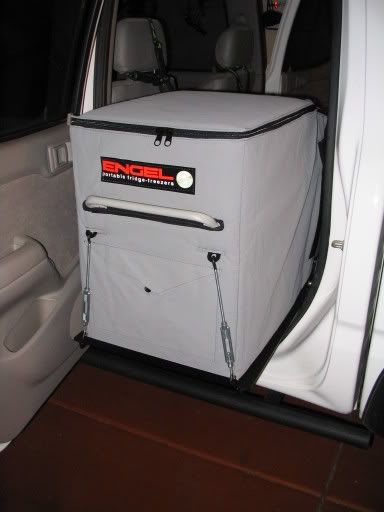
    I also installed the eyes for the hooks, When I decided to keep the slide. It was real easy, unscrew all four hooks holding the handle in place and place the eye brackets behind the handles. While everything was out I also installed the temperature gauge. I am impressed by the sensitivity of this thing. Just by my body being near it I could watch the ambient temperature change! To install I just took of the back and ran it through the clay. Here's some pics:

    Note the temp difference because I touched it to move it...


    My Plasti-Dip job, and cutting of the transit bag:


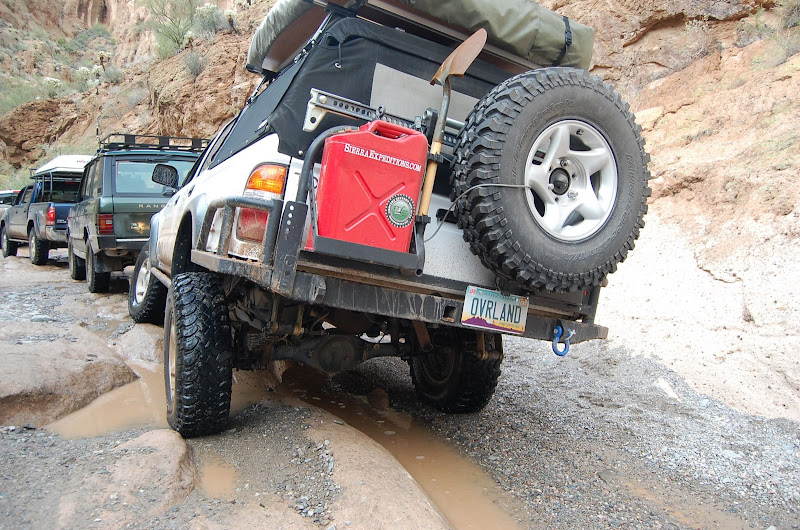
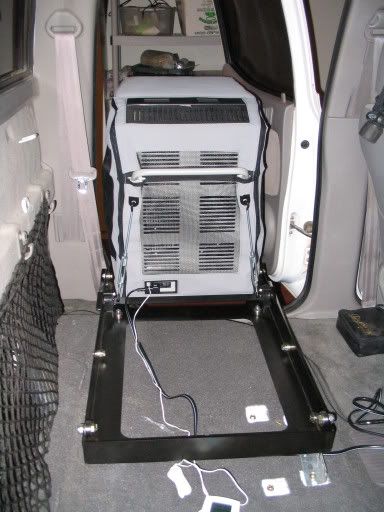
    Shot from the Passenger rear door... Under the slide I am going to mount the Cig attachments, and route my A/C cord out so when parked in the garage, I can just hook-up due to the lack of solar.


    Some final Exterior shots:


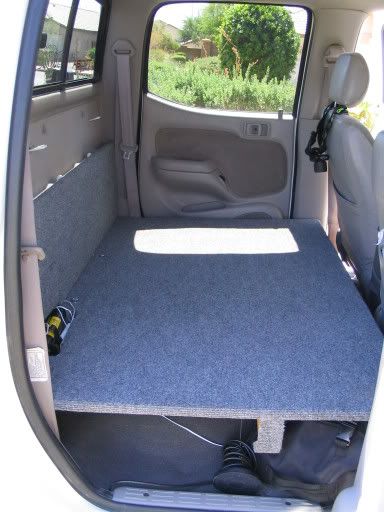
    This was all modified to rear platform which later came out when we had our baby. I wanted a rear platform similar to other set ups I had seen in hope that we might have more room for the dogs (1 Husky and 1 Lab), but I wans thinking baby at the time.


    It is made from Plywood and covered with the cheapest carpet from Home depot. I was able to use all the existing seat holes to mount the wood, and the rear shelf utilized the existing hole that held the hooks in place.


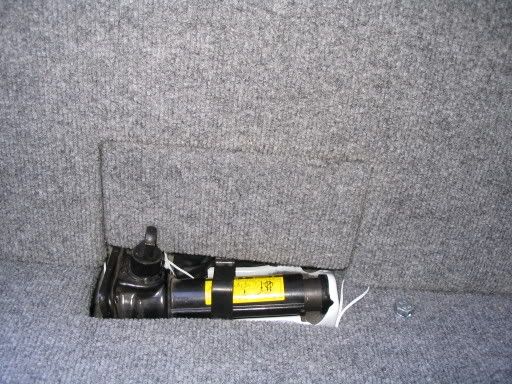
    I was not sure what I want to do with the factory jack, and have actually used it places I could not get the Hi-Jack so it is staying in the truck. I made cut outs and a cover for the rear shelf.


    The platform is now removed, and the stock seats put back in for our baby. The fridge and slide will be moved to the bed along with a custom drawer ststem. More to come on that...
    Wil Kuhns<br />Sierra Expeditions <br /><br />The only regrets in life are the risks you didn&#039;t take.<br /><br />Mod Progress Gauge: [|||||||||-] = 90% Complete as of 03 FEB 2008. My Taco&#039;s Garage

  2. #12

    Gauge Pod and Gauges

    I am using a a Lotek Gauge Pod, and a Cyberdyne battery, and temp gauge (will be used for the fridge) that was purchased for me as a gift from my wife. I didn't even ask for it, she just thought it was bad ass and got me it. How cool is that!?

    Well the install was pretty basic, remove the old A Pillar cover and replace with the Lo-Tek. I had to drill 2 hole in the A-pillar and total install was around 2 hours.

    Here you can see the two, OEM and Lo-Tek side by side:


    The Lo-Tek required slight sanding for the Cyberdyne Gauges to fit.
    I ended up with a Voltmeter and an Ambient Temp gauge (for the fridge).

    I took Duct Tape to the rear to prevent rattles on washboards as shown:


    Final install Pics:


    I am toying with the idea of adding more temperature senders for the temp gauge.
    1. Engel Fridge/Freezer
    2. TwoZone Unit
    3. Ambient Air


    I could then use a 3-Way selecting switch to switch between the three.
    Wil Kuhns<br />Sierra Expeditions <br /><br />The only regrets in life are the risks you didn&#039;t take.<br /><br />Mod Progress Gauge: [|||||||||-] = 90% Complete as of 03 FEB 2008. My Taco&#039;s Garage

  3. #13

    Series 3 Eezi-Awn 1600


    Here it is currently "airing out" in the garage, since it has the fresh coat of wood sealer smell to it.


    My wife was just as excited as I was, and brought the "kids" out to see what the excitement was...


    Now it is time to fab up the mount and get it on the Taco and go take it out!
    Wil Kuhns<br />Sierra Expeditions <br /><br />The only regrets in life are the risks you didn&#039;t take.<br /><br />Mod Progress Gauge: [|||||||||-] = 90% Complete as of 03 FEB 2008. My Taco&#039;s Garage

  4. #14

    Tent Rack

    Here my rack is about 75%:


    Well here the rack is complete:


    Here you can see how we made the rack removable for increased versatility:


    Wil Kuhns<br />Sierra Expeditions <br /><br />The only regrets in life are the risks you didn&#039;t take.<br /><br />Mod Progress Gauge: [|||||||||-] = 90% Complete as of 03 FEB 2008. My Taco&#039;s Garage

  5. #15

    Re: FlyingWil's '01 Taco DC

    Oh yeah.... this puppy goes on tomorrow....

    Note: This is still in the fabrication phase from last week, not pictured is the tire carrier. Steve at http://www.cbioffroadfab.com/index.php"]CBI Off-road Fabrication[/URL] is making the rear swing bumper.


    Wil Kuhns<br />Sierra Expeditions <br /><br />The only regrets in life are the risks you didn&#039;t take.<br /><br />Mod Progress Gauge: [|||||||||-] = 90% Complete as of 03 FEB 2008. My Taco&#039;s Garage

  6. #16

    Re: FlyingWil's '01 Taco DC

    Installed the bumper and put it to the test! (disregard the spare my 255 spare went Tango Uniform)


    None of the pics of the drawer system came out... this is the best one...

    It is not 100% done... but close.


    UPDATE:
    Wil Kuhns<br />Sierra Expeditions <br /><br />The only regrets in life are the risks you didn&#039;t take.<br /><br />Mod Progress Gauge: [|||||||||-] = 90% Complete as of 03 FEB 2008. My Taco&#039;s Garage

  7. #17

    Shrockworks Bumper Installed

    I finally got my Shrockworks front bumper on after having sit in may garage nearly three weeks. I came down with a wicked cold that prevented me from doing anything.

    While the bumper was off I decided to get rid of the chrome, to suit my phobia, so I painted the chrome after a quick rub with some 320 grit sand paper and hit it with a Duplicolor Truck and SUV black. End results look good IMO.


    I was able to install everything but the winch, as I ran out time, and my truck is my DD. That will come in a later week.


    Wil Kuhns<br />Sierra Expeditions <br /><br />The only regrets in life are the risks you didn&#039;t take.<br /><br />Mod Progress Gauge: [|||||||||-] = 90% Complete as of 03 FEB 2008. My Taco&#039;s Garage

  8. #18

    Re: FlyingWil's '01 Taco DC

    Just got the winch built and installed!!! About time. The winch is a hybrid T-MAX 9000. It started off with the EW-9000-WCP competition winch, and I swapped drums, winch brake, and tire bars with an EW-9000W, and added 100' of Master Pull synthetic 5/16" with a Viking HD line protector added...

    I have scattered pictures... so bear with me as I start to upload them...


    More to come as I get the pics organized...
    Wil Kuhns<br />Sierra Expeditions <br /><br />The only regrets in life are the risks you didn&#039;t take.<br /><br />Mod Progress Gauge: [|||||||||-] = 90% Complete as of 03 FEB 2008. My Taco&#039;s Garage

  9. #19

    Re: FlyingWil's '01 Taco DC

    Updated pic...


    Need to fix the CB antenna before this weekend...
    Wil Kuhns<br />Sierra Expeditions <br /><br />The only regrets in life are the risks you didn&#039;t take.<br /><br />Mod Progress Gauge: [|||||||||-] = 90% Complete as of 03 FEB 2008. My Taco&#039;s Garage

Page 2 of 2 FirstFirst 12

Posting Permissions

  • You may not post new threads
  • You may not post replies
  • You may not post attachments
  • You may not edit your posts
  •