Page 1 of 3 123 LastLast
Results 1 to 10 of 30

Thread: 22re rebuild

  1. #1

    22re rebuild

    Well it's been awhile since I have been here so I thought that I would show ya all what I have been up to as of late here is a quick break down of the parts and the start of the rebuild

    http://mkelly.proboards.com/index.cg...ay&thread=8778

    Needless to say this is a dead board so I am still running the complete wright up on here

    http://www.yotatech.com/f116/so-22re...begins-185041/

    If it is not acceptible to post for these sites I will remove the links and start over here and any one with any advise please feel free to throw it out there this is the first motor rebuild I have ever done from the bare block up well aleast in a car/truck Harley's are a different story
    1990 4 runner <br />5.29 front with Aisin hubs coming soon Aussie locker<br />5.29 rears with TRD limited slip <br />35 x 12.5 x 15 B.F.Goodrich KO&#039;s<br />15 x 8 Micky Thompson Classic II rims<br />Pro Comp stage II 4&quot; suspension lift<br /><br />1955 Panhead Original Hardtail frame and Kick start only<br />Springer front end stock rake <br />Home made Stretched tanks <br />Arlen Ness Hand built rear Taildragger fender tombstone taillight<br />I am the SECOND OWNER did all the work myself<br /><br />1998 flhtc Dresser<br />Stretched tanks <br />Arlen Ness Fat Tail rear fender<br />Arlen Ness custom extended hard bags with my custom exhaust running Thur Nascar Style dual tip out both sides (4 tips total)<br />Stealth Bomber Radar absorbing flat black paint

  2. #2

    Re: 22re rebuild

    all boards could use conversation... directing people elsewhere isnt helping change what you see as a problem!

    bring the pics and info here, i'm sure we'd all love to see this thing take shape.
    -Lee
    2013 BMW X6 50i

  3. #3

    Re: 22re rebuild

    Well here's the latest progress that I have made on the rebuild mind you all this is just mock up for now until I get my one ring that broke then it's all going to be set up to run
    [img width=800 height=600]http://i184.photobucket.com/albums/x275/fifty5panhead/22re%20rebuild/DSCN3719.jpg[/img]
    [img width=800 height=600]http://i184.photobucket.com/albums/x275/fifty5panhead/22re%20rebuild/DSCN3718.jpg[/img]
    [img width=800 height=600]http://i184.photobucket.com/albums/x275/fifty5panhead/22re%20rebuild/DSCN3717.jpg[/img]
    [img width=800 height=600]http://i184.photobucket.com/albums/x275/fifty5panhead/22re%20rebuild/DSCN3719.jpg[/img]
    1990 4 runner <br />5.29 front with Aisin hubs coming soon Aussie locker<br />5.29 rears with TRD limited slip <br />35 x 12.5 x 15 B.F.Goodrich KO&#039;s<br />15 x 8 Micky Thompson Classic II rims<br />Pro Comp stage II 4&quot; suspension lift<br /><br />1955 Panhead Original Hardtail frame and Kick start only<br />Springer front end stock rake <br />Home made Stretched tanks <br />Arlen Ness Hand built rear Taildragger fender tombstone taillight<br />I am the SECOND OWNER did all the work myself<br /><br />1998 flhtc Dresser<br />Stretched tanks <br />Arlen Ness Fat Tail rear fender<br />Arlen Ness custom extended hard bags with my custom exhaust running Thur Nascar Style dual tip out both sides (4 tips total)<br />Stealth Bomber Radar absorbing flat black paint

  4. #4

    Re: 22re rebuild

    Wow, that's pretty nice! Can't wait to see it installed.
    My signature

  5. #5

    Re: 22re rebuild

    Looks great!

    It's amazing how narrow it looks out of the truck. Those headers really cut down the size compared to stock.

    Erich
    -Erich
    99' Black Highlander 4runner / Garage Profile / Black P/C 8x16 Wheeler Off-Road alloy wheels / Husky floor liners / Thule MOAB Rack
    Alaskan Waterfowler Blog

  6. #6

    Re: 22re rebuild

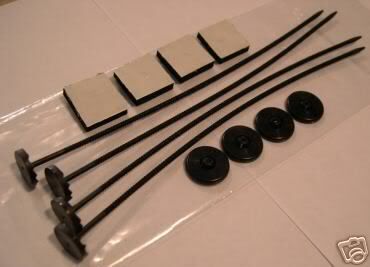
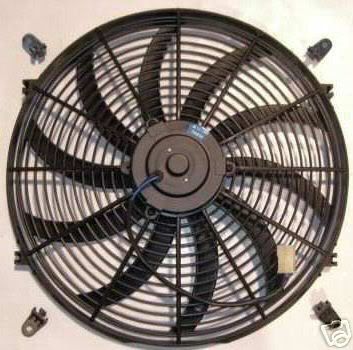
    I ordered a couple new parts to help keep this new motor cool and keep a couple extra pony's where they belong and just maybe as the sells person say's get 1-3 extra MPG yea sure but will see anyway here's the break down of the fan kit

    Procomp 16 Inch Electronic Thermo Cooling Fan

    Great for Radiators, Oil Coolers, & Transmission Cooler, Condenser etc.

    Part# PC-2054

    * Procomps 12v High Performance Reversible Electrical Cooling Fans are idea for OEM or High Performance applications.
    * Draws only 12.5 Amps!
    * Configured as a puller from the factory, it mounts on the inside and pulls the air through the radiator.
    * Blades and polarity of the wiring can be reversed and it becomes a pusher
    * Universal fit for Cars, Trucks, Muscle Cars, Imports & Domestics, Hot Rods Street Rod, Show Car etc. Chevy Ford Pontiac Olds Chrysler...
    * Includes mounting tabs.
    * 2500 CFM Rating
    Measurements:

    * Thickness- 1 1/2" at edge, 3" at center
    * Height- 16"
    * Width- 17"

    Mounting kit


    16" Fan


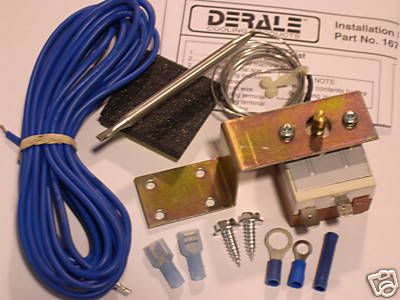
    And this to run it


    Derale Adjustable Dial Electric Fan Control Kit

    Part# 16769


    * Controller mounts on your car or truck
    * Radiator in-hose probe temp sensor.
    * Adjustable dial activates fan between 150-240F degrees.
    * Turn-off is 10 degrees less than turn on.
    * Works with any 12 volt fan.
    * Maximum capacity is 25 amps.
    * A/C override circuit included.
    * Designed for single and dual fan setups.
    * Kit includes switch, harness, probe, wire hardware, universal mounting bracket and installation booklet with diagram.


    1990 4 runner <br />5.29 front with Aisin hubs coming soon Aussie locker<br />5.29 rears with TRD limited slip <br />35 x 12.5 x 15 B.F.Goodrich KO&#039;s<br />15 x 8 Micky Thompson Classic II rims<br />Pro Comp stage II 4&quot; suspension lift<br /><br />1955 Panhead Original Hardtail frame and Kick start only<br />Springer front end stock rake <br />Home made Stretched tanks <br />Arlen Ness Hand built rear Taildragger fender tombstone taillight<br />I am the SECOND OWNER did all the work myself<br /><br />1998 flhtc Dresser<br />Stretched tanks <br />Arlen Ness Fat Tail rear fender<br />Arlen Ness custom extended hard bags with my custom exhaust running Thur Nascar Style dual tip out both sides (4 tips total)<br />Stealth Bomber Radar absorbing flat black paint

  7. #7

    Re: 22re rebuild

    A little more progress today installed the last piston and rings then had to put on head shim (the block was decked .010) so I used some ultra copper rtv to hold it in place then put the head gasket on and head torqued the head to 62 ft.lbs stepping 20 ,40, then 62 ft lbs. and cut the metal shield off the header gasket for a tight fit to the head and lessen the chances of a exhaust leaks from the header. Here's some pic's of the progress next will be pulling the motor out of the 4runner and swapping the bolts to this motor and whatever else needs to go on it.


    [img width=800 height=600]http://i184.photobucket.com/albums/x275/fifty5panhead/22re%20rebuild/DSCN3720.jpg[/img]
    [img width=800 height=600]http://i184.photobucket.com/albums/x275/fifty5panhead/22re%20rebuild/DSCN3721.jpg[/img]
    [img width=800 height=600]http://i184.photobucket.com/albums/x275/fifty5panhead/22re%20rebuild/DSCN3723.jpg[/img]
    [img width=800 height=600]http://i184.photobucket.com/albums/x275/fifty5panhead/22re%20rebuild/DSCN3729.jpg[/img]
    [img width=800 height=600]http://i184.photobucket.com/albums/x275/fifty5panhead/22re%20rebuild/DSCN3728.jpg[/img]


    1990 4 runner <br />5.29 front with Aisin hubs coming soon Aussie locker<br />5.29 rears with TRD limited slip <br />35 x 12.5 x 15 B.F.Goodrich KO&#039;s<br />15 x 8 Micky Thompson Classic II rims<br />Pro Comp stage II 4&quot; suspension lift<br /><br />1955 Panhead Original Hardtail frame and Kick start only<br />Springer front end stock rake <br />Home made Stretched tanks <br />Arlen Ness Hand built rear Taildragger fender tombstone taillight<br />I am the SECOND OWNER did all the work myself<br /><br />1998 flhtc Dresser<br />Stretched tanks <br />Arlen Ness Fat Tail rear fender<br />Arlen Ness custom extended hard bags with my custom exhaust running Thur Nascar Style dual tip out both sides (4 tips total)<br />Stealth Bomber Radar absorbing flat black paint

  8. #8

    Re: 22re rebuild

    Got a little bit of overspray on that head, huh? Lookin good man, keep it coming!!
    -Chris
    2004 DoubleCab Tacoma PreRunner: 3.4 V6-Auto, DD/Tow Rig
    1997 Lexus LX450: 4.5 I6-Auto, DD
    1984 4Runner: 22R-5 speed, 14 inch bob, 5.29's, lincoln locked rear, lockright front, Armored and Caged by Mossyrocks Fabrication, total disregard for body damage.
    1997 4Runner: GONE
    1996 FZJ80 Land Cruiser: GONE

  9. #9

    Re: 22re rebuild

    Quote Originally Posted by 04 Rocko Taco
    Got a little bit of overspray on that head, huh? Lookin good man, keep it coming!!
    Yea had to do a touch up and got a bit of overspray but it will be gone soon enough.

    Anyway here is today's progress report you got to take into account that I am

    1. tearing down one motor in the truck and building this one from scratch but using the bolts and nuts from the other motor and

    2. A first time motor builder here so I am getting full on the job training as I build this motor.

    I do HARLEY's with no issue's so it not like I have no back round in mechanic's so don't get me wrong and think I have never touched a wrench before but this is a totally new venture here and mock up is a big deal with building a HARLEY to make sure everything fits and seats properly you build a HARLEY 3 times before putting it together lol.

    So to anyone that thinks it's not in you to do this I say try it before you give up and let someone else do it for you , learning never is a bad thing may not get it done as fast as you want but get it done you will and have the pride of saying you did it yourself!

    For the record I have no help from anyone and I am using boards like this to get all my info as I build this , the info is there you just have to search it out and I will be glad to share what I have learned and where to find the info if anyone is thinking about trying this.

    Most torque values I am reverse torquing and then double checking printed materials to make sure the torque value I am using are indeed correct

    [img width=800 height=600]http://i184.photobucket.com/albums/x275/fifty5panhead/22re%20rebuild/DSCN3735.jpg[/img]
    [img width=800 height=600]http://i184.photobucket.com/albums/x275/fifty5panhead/22re%20rebuild/DSCN3734.jpg[/img]
    [img width=800 height=600]http://i184.photobucket.com/albums/x275/fifty5panhead/22re%20rebuild/DSCN3733.jpg[/img]
    1990 4 runner <br />5.29 front with Aisin hubs coming soon Aussie locker<br />5.29 rears with TRD limited slip <br />35 x 12.5 x 15 B.F.Goodrich KO&#039;s<br />15 x 8 Micky Thompson Classic II rims<br />Pro Comp stage II 4&quot; suspension lift<br /><br />1955 Panhead Original Hardtail frame and Kick start only<br />Springer front end stock rake <br />Home made Stretched tanks <br />Arlen Ness Hand built rear Taildragger fender tombstone taillight<br />I am the SECOND OWNER did all the work myself<br /><br />1998 flhtc Dresser<br />Stretched tanks <br />Arlen Ness Fat Tail rear fender<br />Arlen Ness custom extended hard bags with my custom exhaust running Thur Nascar Style dual tip out both sides (4 tips total)<br />Stealth Bomber Radar absorbing flat black paint

  10. #10

    Re: 22re rebuild

    A little update for today
    Well I finally got the crank pulley off today so it was a good day and a chance to start to really assemble the front of the motor so I started by putting in the new ENGNBLDR timing chain kit with metal rail on drivers side and put the extra headbolt in place then ran into a small issue that I can not seem to find an answer for on the oil pump and here it is in the picture below you will see to black circles around two arrows one on each gear but I can not get them to line up to each other and find a point to line them up to on the housing. The arrows line up to either one before or one after each other but not in line with each other any ideas or suggestions on how they line up?

    [img width=800 height=600]http://i184.photobucket.com/albums/x275/fifty5panhead/22re%20rebuild/DSCN3741-1.jpg[/img]
    [img width=800 height=600]http://i184.photobucket.com/albums/x275/fifty5panhead/22re%20rebuild/DSCN3740.jpg[/img]
    [img width=800 height=600]http://i184.photobucket.com/albums/x275/fifty5panhead/22re%20rebuild/DSCN3739.jpg[/img]

    oops almost forgot here is where I am stuck at

    [img width=800 height=600]http://i184.photobucket.com/albums/x275/fifty5panhead/22re%20rebuild/DSCN3744.jpg[/img]

    OK well I just got done play'in some more could not let it be it was bothering me bad so I found out from TED at ENGNBLDR.COM (where the rebuild kit came from) that there is no way to line the arrows up so I went for it and got a few more things done tonight a little more painting and then replacing the missing parts so here is what I was doing until 4:30 am

    [img width=800 height=600]http://i184.photobucket.com/albums/x275/fifty5panhead/22re%20rebuild/DSCN3744.jpg[/img]
    [img width=800 height=600]http://i184.photobucket.com/albums/x275/fifty5panhead/22re%20rebuild/DSCN3750.jpg[/img]
    [img width=800 height=600]http://i184.photobucket.com/albums/x275/fifty5panhead/22re%20rebuild/DSCN3748.jpg[/img]
    [img width=800 height=600]http://i184.photobucket.com/albums/x275/fifty5panhead/22re%20rebuild/DSCN3747.jpg[/img]
    [img width=800 height=600]http://i184.photobucket.com/albums/x275/fifty5panhead/22re%20rebuild/DSCN3745.jpg[/img]
    [img width=800 height=600]http://i184.photobucket.com/albums/x275/fifty5panhead/22re%20rebuild/DSCN3753.jpg[/img]
    [img width=800 height=600]http://i184.photobucket.com/albums/x275/fifty5panhead/22re%20rebuild/DSCN3752.jpg[/img]
    [img width=800 height=600]http://i184.photobucket.com/albums/x275/fifty5panhead/22re%20rebuild/DSCN3751.jpg[/img]

    The new electric fan pulls 2500 cfm

    [img width=800 height=600]http://i184.photobucket.com/albums/x275/fifty5panhead/22re%20rebuild/DSCN3758.jpg[/img]
    [img width=800 height=600]http://i184.photobucket.com/albums/x275/fifty5panhead/22re%20rebuild/DSCN3757.jpg[/img]
    1990 4 runner <br />5.29 front with Aisin hubs coming soon Aussie locker<br />5.29 rears with TRD limited slip <br />35 x 12.5 x 15 B.F.Goodrich KO&#039;s<br />15 x 8 Micky Thompson Classic II rims<br />Pro Comp stage II 4&quot; suspension lift<br /><br />1955 Panhead Original Hardtail frame and Kick start only<br />Springer front end stock rake <br />Home made Stretched tanks <br />Arlen Ness Hand built rear Taildragger fender tombstone taillight<br />I am the SECOND OWNER did all the work myself<br /><br />1998 flhtc Dresser<br />Stretched tanks <br />Arlen Ness Fat Tail rear fender<br />Arlen Ness custom extended hard bags with my custom exhaust running Thur Nascar Style dual tip out both sides (4 tips total)<br />Stealth Bomber Radar absorbing flat black paint

Page 1 of 3 123 LastLast

Posting Permissions

  • You may not post new threads
  • You may not post replies
  • You may not post attachments
  • You may not edit your posts
  •