Rear Mount - Firestik II Antenna
By: Bob_98SR5
Written: 11/16/03
_________________________________________________
Tools & Supplies
Vise
3lb hand "sledge" hammer
Drill and drill bits
X-acto blade
Measuring caliper
Soldering iron
Sharpie pen
Loctite
Parts
Firestik Hood Channel Mount (or comparable mount)
Firestik II antenna
Spring adapter mount
Quick-release adapter mount
Rubber grommet
Rubber donut (optional)
Bungee-type cord (optional)
_________________________________________________
Summary
This write up is an "adjustment" to my original installation of my Cobra 75 CB and Firestik II write up which was mounted on a Firestik Hood Channel mount. While the hood channel mount worked perfectly, quite frankly it was an eye sore. In addition, driving with the antenna mounted on a spring mount at highway speeds was a scary experience---the antenna would sway backwards and at times, sway in all directions.
After seeing a picture that of a rear mounted Firestik antenna on a Tacoma Doublecab, I was inspired to do the same. Being the cheap ******* that I am, I decided to see if I could recycle the existing parts and make it work. Being the MacGyver that I can be sometimes, I'm proud to say it worked.Read on.
Note: I've documented this write up and assumed that you've installed your hood channel mount like I did.
Step 1: The Making of a Rear-Mount
Take your Firestik hood channel mount and put it in your vise. Crank that vise until the hood channel intersection (B) is flattened out. If it is not perfectly straight, take your mini-sledge hammer and pound out the mount until it is completely straight:
Here is a pic of the original hood mount. You will need to completely flatten out the 90 degree bend (B)
Here's what the hood channel mount should look like after you straighten it out.
Step 2: Removing the Paneling
To remove the driver's side bottom panel, remove the four 10mm bolts. Next, remove the bottom driver's side kick panel pull it towards you. Next, unscrew the driver's side front and rear kick step panels.
To remove part (A), remove the four 10mm bolts. Panel (B) posts right out. Kick panel (C) will simply unscrew and can be pulled out.
The rear step panel can be unscrewed easily and be pulled out. Unscrew screws (S)
You will need to run the coax through the body of your rear hatch area. Also, you will need to drill into a small portion of the rear hatch area to mount your 'new' antenna mount. Start by using your calipers to determine the diameter of your coax cable. Then drill an appropriate sized hole in area shown below. Insert your rubber grommet.
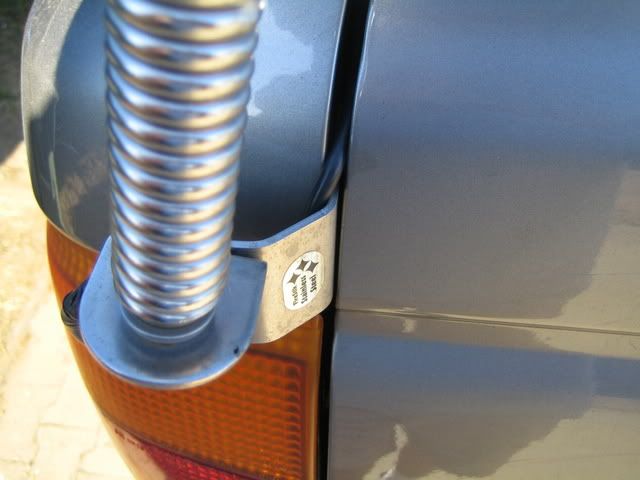
Next, put your 'new' antenna mount against the area shown below (left picture) and mark your pilot holes. Drill your pilot holes, spray with some rust protectant (or spray paint), let dry, put a little loctite on your self-tapping metal screws, and screw in.

This is the approximate size of the area where you will be mounting the new mount.
Drill a hole and insert your rubber grommet.
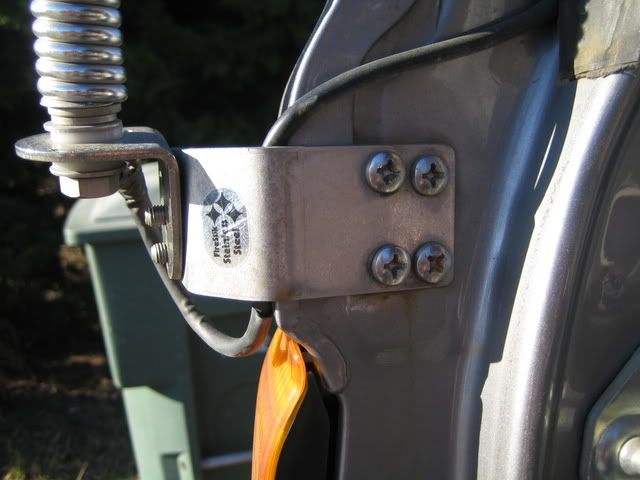
Mark your pilot holes. The original hood channel mount only has three screws. Thus, I drilled/screwed 3 holes. If I were to do it again, I'd drill four holes.
Step 3: Running and Repairing the Coax
At the interior plug end of the coax cable, cut the coax as close to the end as possible. Discard the plug end. Open your hood and then pull the coax cable through the firewall and into the engine bay. Take the coax cable, reattach the end to your new rear antenna mount and run the cut end through your rear hatch area grommet. Run the cable under the carpet, under the step panels, and back to the cb cable box.

Here's a shot of the original cb coax connector. Cut at interesection (A)
Here is the antenna coax end connected to the antenna mount.
You will have to repair and reattach a new coax plug connector. Begin by carefully slicing the black protective cable down about 1.5 inches and remove the covering. Next, pull the braided copper wires outwards---it should look like a lion's mane. Next, cut the plastic white cover down about a half inch down from the top. Next, affix the new connector down and screw it down. You should have some frayed ends poking out. Cut those ends with a pair of scissors. Solder the tip and then you're done. Finish by screwing it into the cable box.
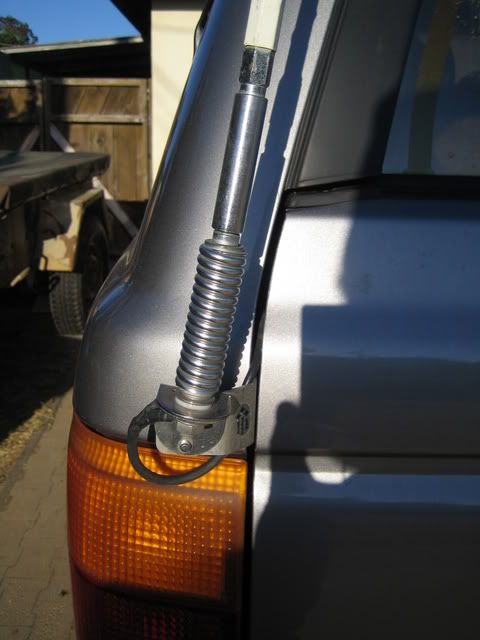
Step 4: Mounting Your Antenna - Usage Notes
Mounting the antenna, of course, is an easy thing to do. However, the antenna will get in the way of opening and closing the rear hatch. Thus, a quick-release or a spring mount must be used in conjunction with your new rear mount.
I prefer to use the quick release mount when driving on the highways. It is much stable than a spring mount. Then when I get to my off-road destination, I will use the spring mount. I also attach a bungee-type cord to the antenna and to the top of my roof rack to avoid the predictable swaying of the antenna.
Click here for some larger, close-up pics of the rear mounted Firestik II Antenna.


 Reply With Quote